Music Marketing Checklist: 12 Steps Before Every Release
Music Marketing Checklist: 12 Steps Before Every Release
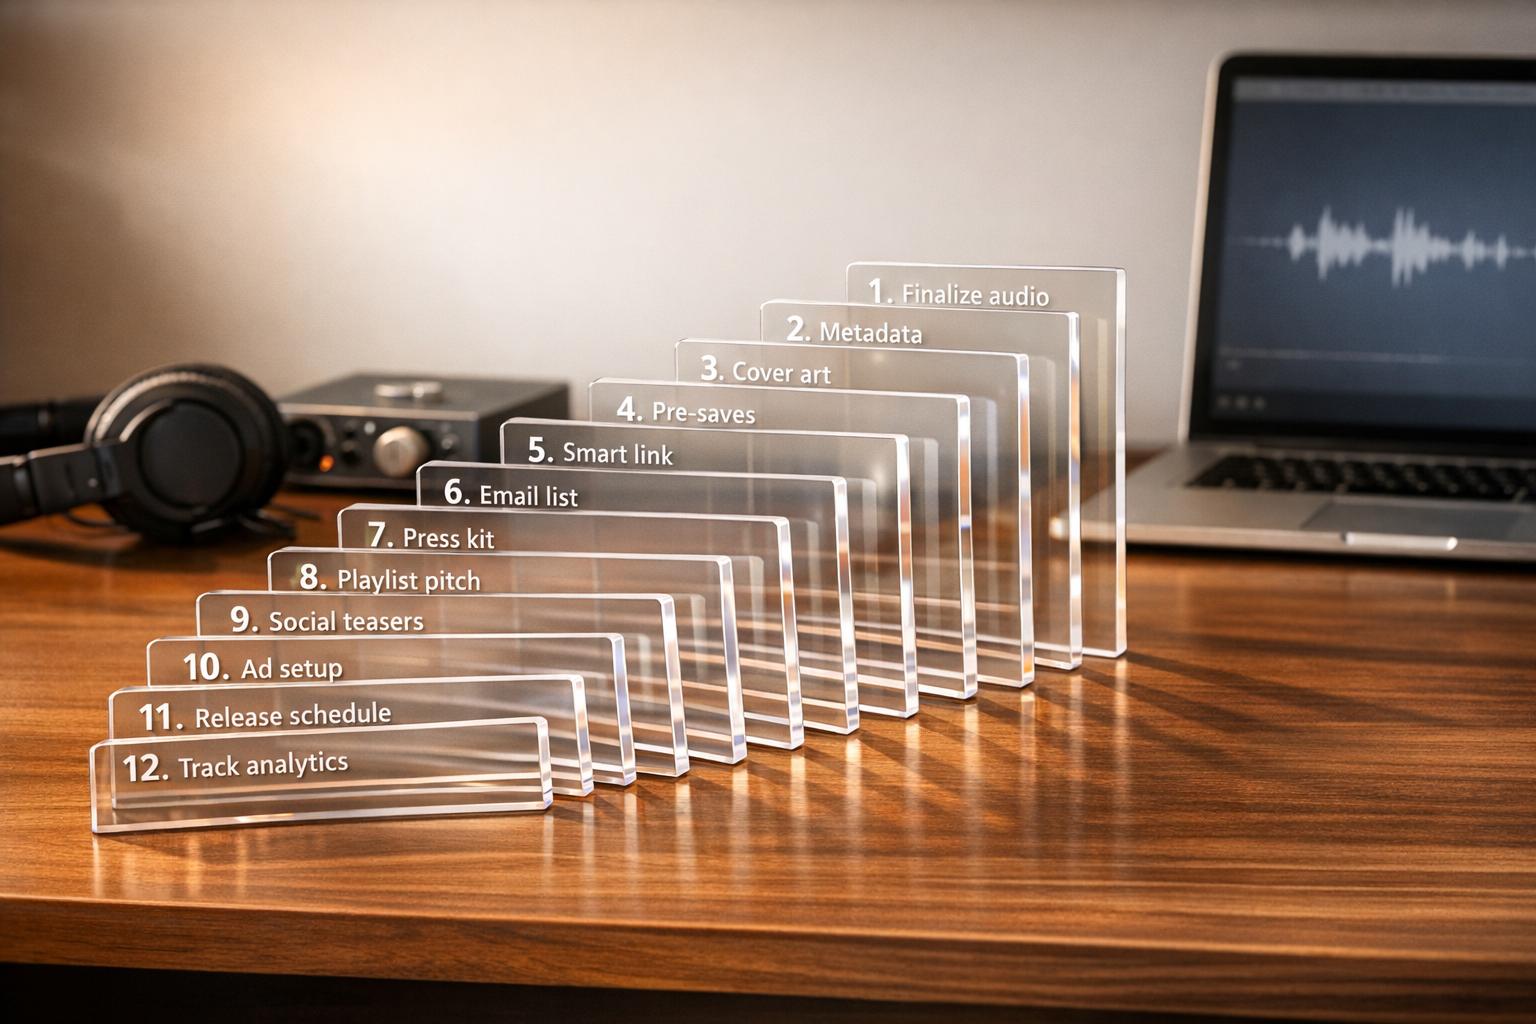
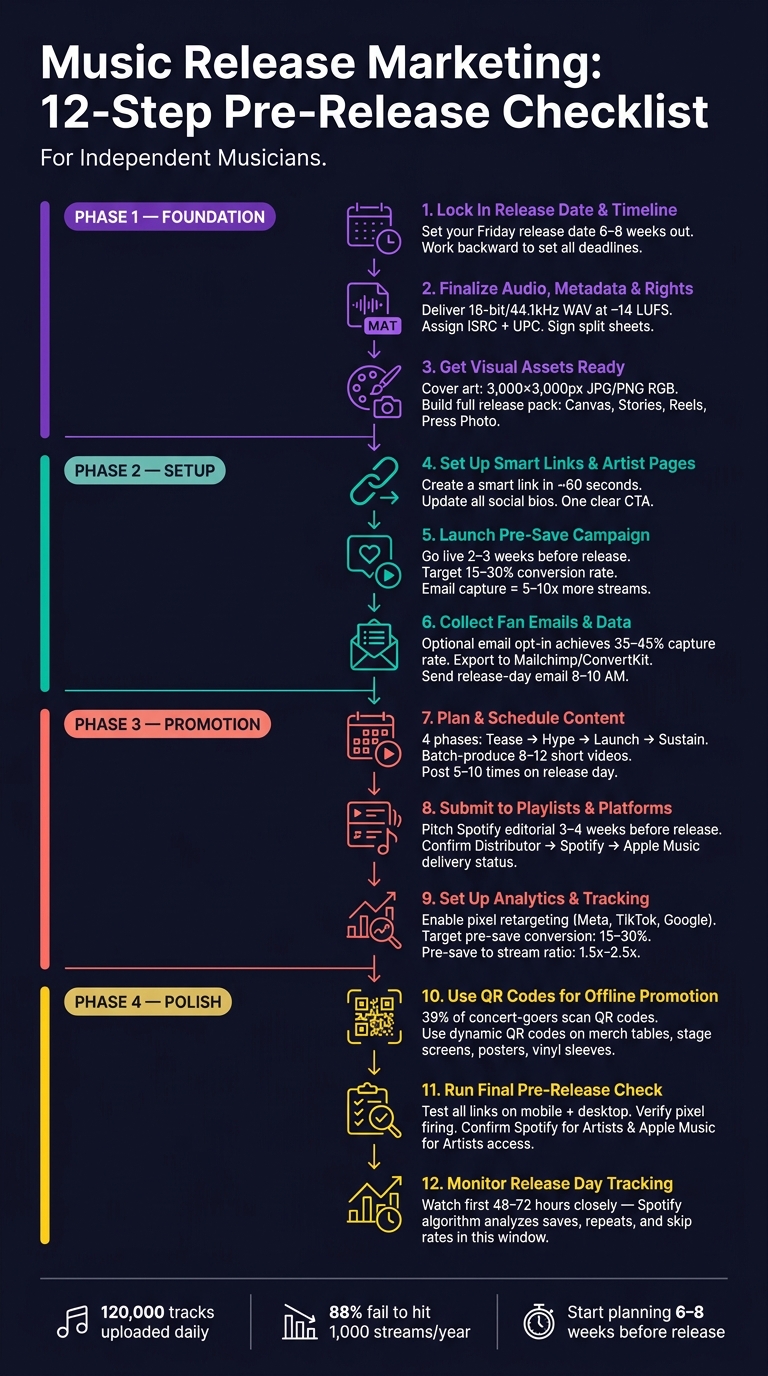
Independent artists often struggle to get their music noticed, with over 120,000 tracks uploaded daily to streaming platforms and 88% failing to hit 1,000 streams in a year. To stand out, you need a solid pre-release marketing plan. This 12-step checklist ensures your release is well-prepared, from setting timelines to promoting effectively.
Key Steps Include:
- Plan Ahead: Lock in your release date 6–8 weeks before launch.
- Prepare Assets: Finalize audio, metadata, visuals, and smart links.
- Boost Engagement: Launch pre-save campaigns, pitch to playlists, and collect fan emails.
- Track and Promote: Use analytics, QR codes, and a content calendar to maximize visibility.
Why It Matters: Platforms like Spotify prioritize early engagement (first 48–72 hours), and missing deadlines for pitching or distribution can hurt your chances of success. This checklist helps you avoid common pitfalls and build momentum for your music.
Quick Overview:
| Step | Focus |
|---|---|
| 1–3 | Set dates, finalize audio, create visuals |
| 4–6 | Launch pre-saves, collect emails, set up links |
| 7–9 | Schedule content, pitch playlists, track analytics |
| 10–12 | Use QR codes, finalize checks, monitor tracking |
A well-executed strategy can turn your release into a standout moment. Ready to dive into the details? Let’s get started.
Music Release Marketing: 12-Step Pre-Release Checklist
How to Release a Single in 2026 (Step-by-Step Guide for Independent Artists)
sbb-itb-e819543
Step 1: Lock In Your Release Date and Campaign Timeline
Your release date is the foundation of your entire campaign. Once you've set it, you can plan every other task - like distribution, pitching, content creation, and pre-saves - by working backward from that date. Without a fixed release date, your planning process can quickly become chaotic.
How to Choose a Release Date
Always aim for a Friday release. Spotify's editorial playlists, such as New Music Friday, update at the start of the weekend, and the Release Radar algorithm kicks off on Fridays. Releasing on any other day can reduce your chances of being discovered on the platform.
Timing is everything. Distributors generally need 2 to 4 weeks to process and deliver your track to all platforms. However, simply uploading your track on time isn’t enough. To submit an editorial pitch to Spotify, your track must already be live on the platform at least 7 days in advance (ideally 3–4 weeks before release). This means you should upload your master audio to your distributor at least 6 weeks before your release date.
Another factor to consider is competition. If a major artist in your genre is releasing music on the same Friday, you’ll be vying for the same audience and playlist spots. Checking release calendars for potential conflicts can give your track a better chance to stand out.
"Choosing your release date is more than just picking a day, it sets the tempo for your entire campaign." - Daimoon Media
How to Build a Campaign Timeline
Once your Friday release date is locked in, you can work backward to set deadlines for key milestones. Here's a breakdown of what your timeline might look like:
| Milestone | Timing | Why It Matters |
|---|---|---|
| Master audio approved | T-8 weeks | Everything else depends on having the final file ready. |
| Cover art finalized | T-7 weeks | Required for uploading to your distributor. |
| Upload to distributor | T-6 weeks | Allows time to fix any metadata issues. |
| Editorial pitch submitted | T-4 weeks | Increases chances of being featured on playlists. |
| Pre-save campaign live | T-2 to 3 weeks | Builds momentum for your release day. |
| Teaser content rollout | T-2 weeks | Engages your audience and boosts algorithm activity. |
| Final link and tracking check | T-1 day | Ensures everything is ready before launch. |
It's important not to announce your release date to the public until your master file is uploaded and your asset plan is finalized. Announcing too early can create unnecessary pressure to meet a deadline, which often leads to rushed metadata or artwork - two common causes of distribution delays and platform rejections.
For a smooth rollout, allow at least 6 weeks for a single, 8 weeks for an EP, and 10–12 weeks for a full album with multiple singles. With your timeline set, you’ll be ready to move on to finalizing your audio files, metadata, and rights in the next step.
Step 2: Finalize Audio, Metadata, and Rights
Once your release date is set, the next step is to ensure your audio files, metadata, and ownership paperwork are all in perfect order. Skipping or rushing through this process is a common reason releases get delayed or rejected by distributors.
Check Your Audio Files and Metadata
Start with your audio files. Always deliver a 16-bit/44.1 kHz WAV file - MP3 masters are a no-go since they degrade the sound quality. If you're working with 24-bit files, make sure every track on your EP or album has the same bit depth and sample rate to avoid issues during distribution. Platforms like Spotify and Apple Music have specific loudness standards - aim for around –14 LUFS for most platforms and –16 LUFS for Apple Music. Keep true peaks at –1.0 dBTP or lower to avoid distortion. Tools like Youlean Loudness Meter can help you quickly verify these levels.
Next, tackle your metadata. Precision is key here. Your artist name should match your DSP profiles exactly. Use the correct fields for featured artists, assign a unique ISRC to each track, and include a UPC for the entire release. For songwriting credits, always use full legal names as registered with your PRO (like ASCAP or BMI), not stage names.
"Metadata isn't just boring admin work - it's royalty insurance and search engine optimization for your music." - Zac Vibert, Revelator
Finalize Ownership and Licensing
Once your audio and metadata are good to go, shift your focus to the legal side. Every collaborator should sign a split sheet that clearly outlines ownership percentages for both the song and the master recording. This includes producers, co-writers, and featured artists.
"Do not release music without written agreement on ownership percentages. Get it in writing before you upload anything." - Orphiq
If your track includes any samples, make sure they're legally cleared before distribution - there’s no wiggle room here. Failing to clear samples can lead to takedowns, withheld royalties, or even legal action. Keep a centralized document with all critical release details - legal names, ownership splits, ISRC codes, and sample clearance confirmations. This will act as your go-to reference throughout your campaign and help avoid costly mistakes.
With your audio files polished and legal rights secured, you're ready to move on to the next marketing stages with confidence.
Step 3: Get Your Visual Assets Ready
Once your audio files are polished and all rights are secured, it’s time to focus on visuals. Many independent artists underestimate the importance of cover art. But the truth is, your artwork is often the first impression a potential listener has of your music. A poorly designed visual can make someone scroll past, no matter how great your track is.
"A strong cover increases click-through rates. A weak one makes listeners scroll past, regardless of how good the music is." - Orphiq
Follow these steps to ensure your visuals grab attention and align with your brand.
Design and Approve Your Cover Art
Every major distributor has specific requirements for cover art: it must be at least 3,000 x 3,000 pixels, saved as a JPG or PNG, and use RGB color mode (not CMYK). If you don’t meet these specs, your submission will be rejected automatically.
Beyond the technical details, remember that your artwork will often be displayed as a tiny thumbnail. This means simplicity is key. Use bold colors, a single focal point, and high contrast to make your design stand out against the muted tones commonly seen in streaming libraries. Keep text minimal - stick to your artist name and release title - and avoid fonts that become unreadable when scaled down. To test your design, shrink it to 100 x 100 pixels and check if it still looks clear.
Be aware of common pitfalls that will get your artwork rejected. These include website URLs, social media handles, any pricing details, and watermarked stock images. Most importantly, ensure the artist name and release title on your artwork perfectly match the metadata submitted to your distributor. Even small differences can cause delays.
Build a Set of Consistent Brand Assets
Releasing music today requires more than just a single piece of cover art. Think of your visuals as part of a "release pack" - a collection of assets designed to work together across different platforms and formats.
Here’s what you’ll need:
| Asset Type | Specifications | Primary Use |
|---|---|---|
| Cover Art | 3,000 x 3,000 px, JPG/PNG, RGB | All streaming platforms (DSPs) |
| Spotify Canvas | 9:16 vertical, 3–8 seconds, MP4/MOV | Spotify mobile engagement |
| Social Teasers | 1,080 x 1,920 px (Stories), 1,080 x 1,080 px (Feed) | Instagram, Facebook pre-release posts |
| Short-Form Video | 9:16 vertical, ~15 seconds | TikTok, Instagram Reels, YouTube Shorts |
| Press Photo | 3,000 px on the long edge | EPK, blogs, media outreach |
To save time and maintain a cohesive look, batch your production. For example, when shooting press photos or recording video content, capture multiple setups and outfit changes. This gives you enough material to cover 3–5 future releases, keeping your visuals consistent without needing a full production for every release.
Aim to finalize all your assets at least four weeks before your release date. This timeline allows you to focus on creating promotional content without feeling rushed.
Step 4: Set Up Smart Links and Artist Pages
Once your visual assets are ready, the next step is ensuring fans can easily find and stream your music - on the platform of their choice. That’s where a smart link comes in. It directs fans to their preferred streaming service, eliminating the need to commit to just one platform.
Create a Smart Link for Your Release
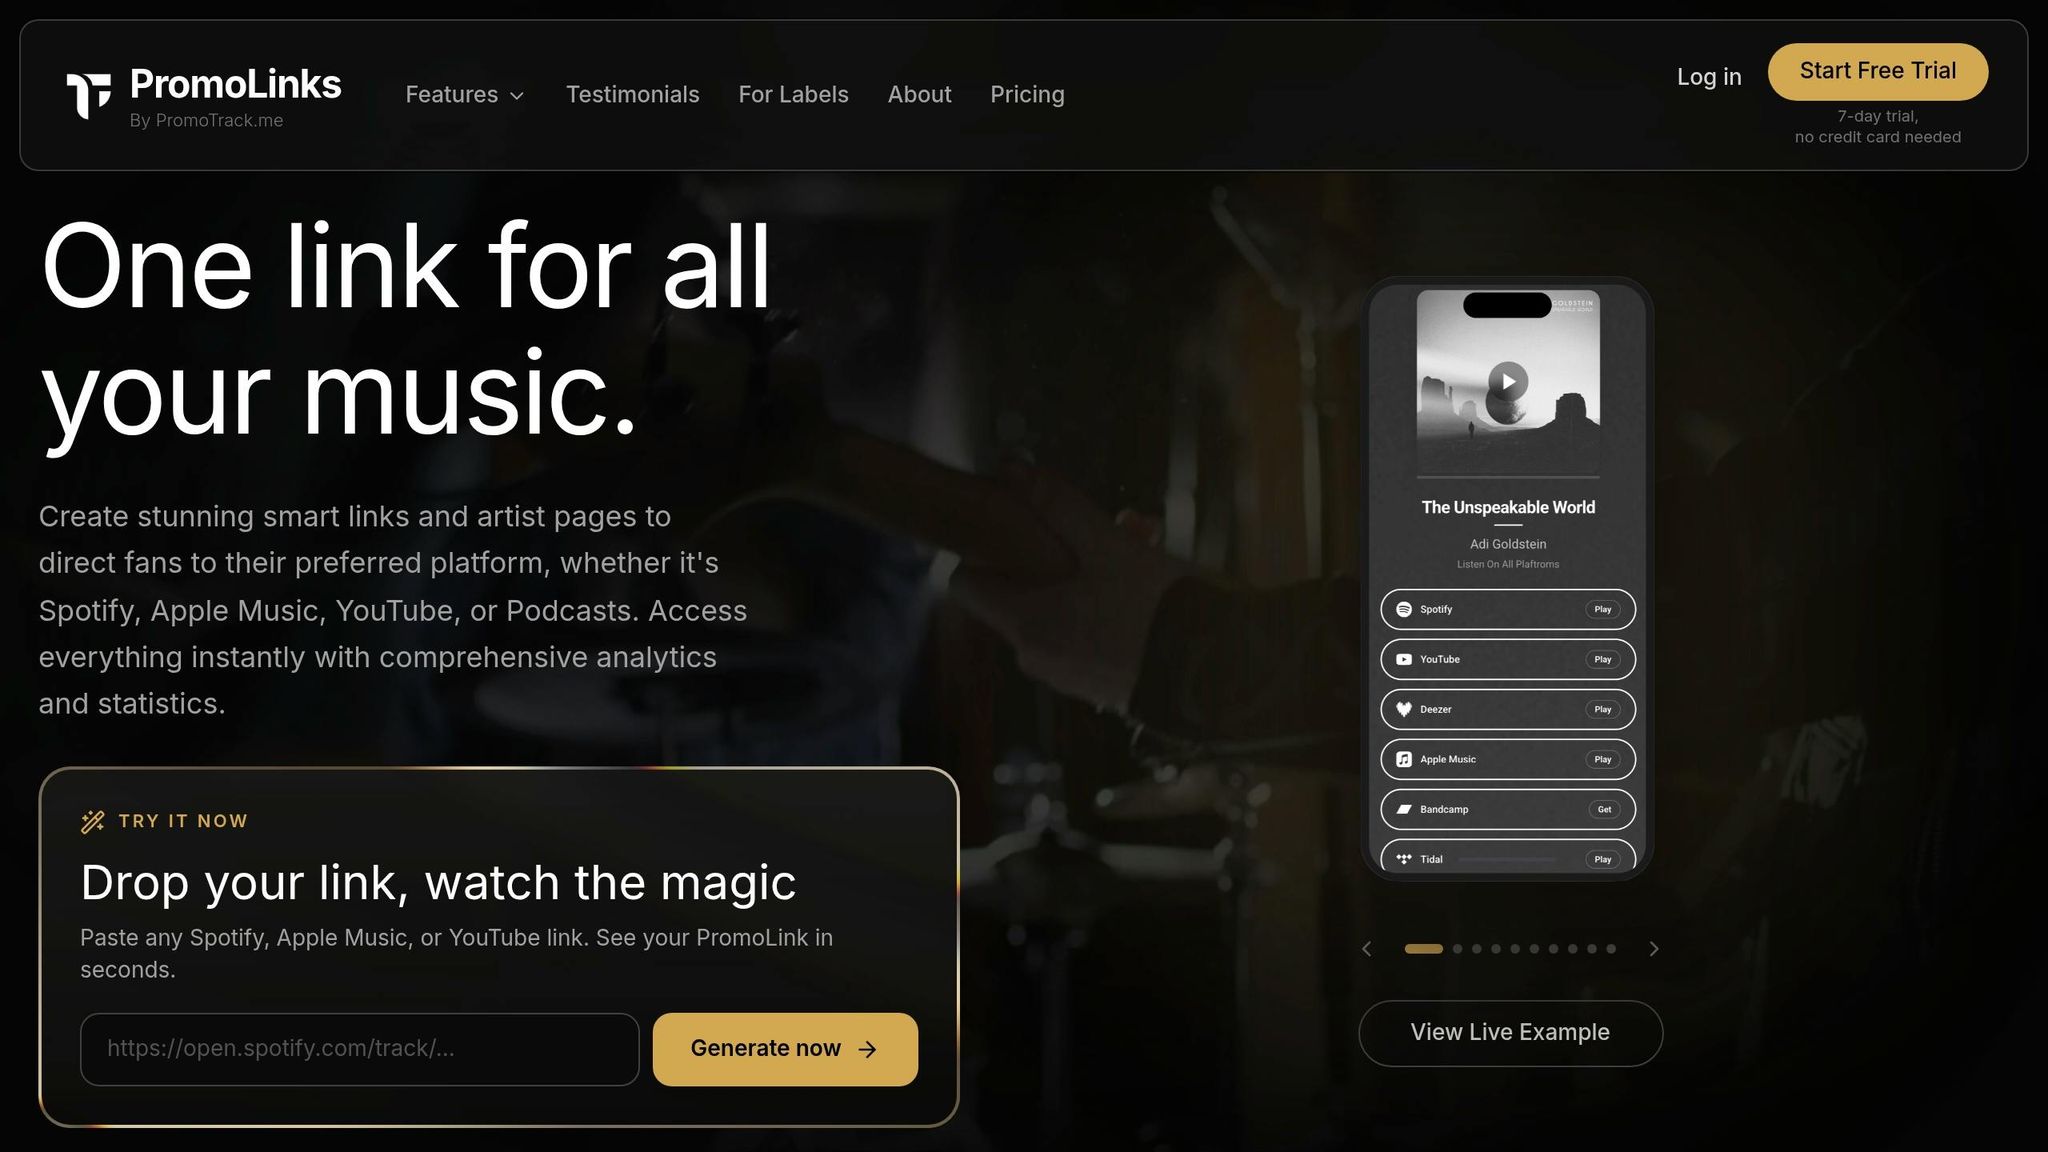
Creating a smart link with PromoLinks.me is quick and straightforward - it takes just about 60 seconds. Upload your release details, connect your streaming URLs, and add your cover art. Then, choose a template that aligns with the visual style you established earlier in Step 3. The result? A clean, organized landing page that supports all major digital streaming platforms (DSPs).
To get the most out of your smart link:
- Use custom link aliases tailored to each channel.
- Test the link on mobile to ensure your cover art displays perfectly.
- Double-check that all buttons lead to the correct destinations.
These small steps ensure the experience stays consistent with your branding and avoids any hiccups.
"The success of a release doesn't just depend on the music - it hinges on how you launch it." - MusicBizQR
A well-designed smart link can convert 15–30% of visitors. On the flip side, poor performance often comes down to slow load times, cluttered layouts, or a weak call-to-action. Keep it simple: one clear call-to-action, your cover art prominently displayed, and no distractions.
Update Your Artist Page
After perfecting your smart link, turn your attention to your artist page. Think of it as your music hub - a "link in bio" that showcases your latest release, social links, email signups, and upcoming events. If your artist page still highlights an old release, you’re missing a chance to engage new fans.
Before your release, refresh your artist page by:
- Adding the new cover art.
- Updating your bio to mention the latest release.
- Setting the new smart link as the primary call-to-action.
Don’t stop there - update the smart link across your social media bios on Instagram, TikTok, and X. Consistency across platforms not only builds trust but also makes it easier for first-time visitors to become long-term fans.
Step 5: Launch a Pre-Save Campaign
Once your smart link is live and your artist page is updated, it’s time to roll out your pre-save campaign. A pre-save campaign lets fans click a button so your track automatically appears in their library the moment it’s released. It’s a straightforward way to ensure your music reaches listeners right away.
"A pre-save is the single highest-leverage thing you can do before a release." - Ulises, NotNoise Team
Set Up Your Pre-Save Flow
If you're using PromoLinks.me, pre-save campaign tools are available across all plans, starting at just $7/month with the Indie tier. Setting up a campaign is quick: connect your distribution link, upload your cover art, and enable email capture on your landing page. Why email capture? Because email subscribers are 5 to 10 times more likely to stream, save, and share your music on release day compared to social media followers.
A solid pre-save page with a simple email signup field typically sees a 35–45% conversion rate for email signups, with only a small 5–8% drop-off in pre-save completions. To boost signups, offer exclusive perks like early previews, behind-the-scenes content, or first dibs on new merch. Make it feel rewarding for fans, not transactional.
"The value proposition is convenience for the listener, not a favor for you." - Orphiq
For best results, aim for your pre-save count to equal 10–20% of your active audience, whether that’s your email subscribers or monthly listeners. A healthy campaign should convert 15–30% of landing page visitors into pre-saves. On release day, those pre-saves often translate into 1.5x to 2.5x the pre-save number in streams. For example, 200 pre-saves could lead to 300–500 streams on day one.
Once your pre-save page is ready, the next step is driving traffic to it.
Drive Traffic to Your Pre-Save Page
Timing is everything when it comes to promoting your pre-save campaign. Launch it 2–3 weeks before your release date. If you start too early, you risk losing momentum. Start too late, and you miss the chance to build anticipation. Use the first week or two to tease your track and build curiosity. Once fans are hooked, drop your pre-save link to capitalize on their interest.
When creating content to promote your pre-save, focus on quantity over chasing viral hits.
"The era of one viral clip carrying a release is over. What does work is volume: more clips, more angles, more anchor points back to the pre-save link." - ChatCut
Plan to create 12–15 vertical videos - like lyric clips or performance snippets - and post three per day during the two weeks leading up to your release. Use tools that simplify access to your pre-save link. For instance, Instagram Story link stickers are highly effective because they require minimal effort from viewers.
On TikTok, take advantage of the “Add to Music App” feature, which has already driven over 1 billion saves to Spotify and Apple Music since its introduction in 2024. And don’t forget about Apple Music listeners - they make up about 25–30% of streaming audiences, so ensure your pre-save page supports pre-adds for them too.
Step 6: Collect Fan Emails and Data
Once your pre-save campaign is live, it’s time to focus on something more lasting than streams: collecting fan emails. While social media followers are borrowed connections, email subscribers are a direct line to your audience - one you control.
"If all you collect is Spotify saves, you have built on rented ground. Spotify owns that relationship, not you." - Florencia Flores, NotNoise
Enable Email Capture on Your Smart Links
PromoLinks.me makes email capture easy (available on plans starting at $7/month). Simply toggle the email capture feature in your smart link or pre-save page settings. Placement is key - keep the email field above the fold so it’s visible on mobile without scrolling.
You can decide whether email signup is required or optional. Making it optional with a clear call-to-action like "Get notified when it drops" reduces friction and often leads to higher conversions. In fact, pre-save pages with optional email signups typically achieve 35–45% email capture rates, with only a 5–8% drop in total pre-saves. Want to improve those numbers even more? Offer an incentive. Exclusive perks like a 15-second snippet, demo, or early access to a music video can increase opt-in rates by up to six times compared to standard artist websites.
Once you’ve started collecting emails, the next step is to organize and use this data effectively.
Manage and Use Your Fan Data
Regularly export your email list and import it into an email service provider like Mailchimp, ConvertKit, or Klaviyo. These tools let you segment your audience by release, automate welcome emails with thank-you gifts, and schedule key communications like release-day reminders.
Timing is everything. For release-day emails, aim to send them between 8:00 AM and 10:00 AM in your largest listener base’s timezone. Avoid midnight sends, as they tend to underperform. Also, ensure you’re only contacting fans who’ve explicitly opted in - double-check their consent before adding them to your campaign list.
Another creative way to grow your email list is by leveraging QR codes at live shows. For instance, an independent Electronic/R&B artist used QR codes at two concerts to secure 94 pre-saves for an upcoming release. Fans attending your shows are often highly engaged and more likely to open emails and stream your music as soon as it’s available.
Step 7: Plan and Schedule Your Content
A content calendar can make the difference between a smooth, strategic rollout and a chaotic mess. Without a clear plan, your content’s quality and consistency can fall apart, especially during critical release weeks.
"A successful release is no longer defined by the release date itself. It is defined by the four weeks leading into it." - Sonikit
Build a Content Calendar
Break your campaign into four distinct phases - Tease, Hype, Launch, and Sustain - with specific goals for each. Start planning 4–6 weeks ahead of your release date to give yourself ample time to execute.
| Phase | Timing | Primary Goal | Content Focus |
|---|---|---|---|
| Tease | T-4 to T-2 Weeks | Build curiosity | Studio clips, cryptic visuals, lyric fragments |
| Hype | T-2 to T-1 Week | Drive pre-saves | Hook teasers, cover art reveal, countdowns |
| Launch | Release Week | Maximize streams | "Out Now" posts, Go Live sessions, song stories |
| Sustain | Weeks 2–4 Post-Release | Maintain momentum | Acoustic versions, lyric videos, fan reposts |
During the Tease phase, aim to post 1–2 times daily. On release day, ramp up to 5–10 posts to maximize visibility. Keep in mind that most of your followers won’t see every post, so repetition - presented in different ways - isn’t overkill, it’s essential.
Don’t forget to account for your dependency chain. For example, you can’t pitch your song to Spotify editors without distributing it first, and distribution requires finalized artwork. By mapping out these dependencies in your calendar, you’ll avoid last-minute bottlenecks. This planning aligns with earlier tasks, like setting pre-saves and finalizing visuals, to ensure everything flows smoothly.
Once your calendar is in place, shift gears to creating all the promotional content you’ll need.
Prepare Your Promotional Content
With your schedule locked in, batch-produce your content ahead of time. Aim to film and edit 8–12 short-form videos in one session, ideally at least three weeks before your release. This approach frees you up during the campaign to engage with fans and respond to momentum, rather than scrambling to create posts on the fly.
In the Tease phase, focus on sparking curiosity. Share studio clips, cryptic visuals, or lyric fragments, but hold back the full chorus. When you move into the Hype phase, shift to 15–30 second hook teasers with a clear call-to-action for pre-saves. Make sure all videos are optimized for mobile viewing, and use tools like Instagram Story link stickers to make pre-saving as easy as possible.
"Most independent artists spend months making a song and then spend one day promoting it. That is backwards." - Florencia Flores, NotNoise
On release day, pin your announcement post and go live on Instagram or TikTok. This creates a shared, interactive moment with your audience. After the initial buzz, don’t let the momentum fade. Over the next few weeks, release secondary content like acoustic versions, lyric breakdowns, or fan reaction reposts. This staggered approach helps maintain engagement and keeps streams steady beyond the first week.
Step 8: Submit to Playlists and Platforms
Now that your content is finalized and your pre-save campaign is set up, it’s time to focus on playlist submissions and confirming your distribution details. Getting this step right early on can save you from last-minute headaches.
Pitch to Editorial Playlists
Spotify’s editorial playlists are a major opportunity to reach new listeners, and you can submit your track for consideration directly through Spotify for Artists. Timing is key - submit your pitch 3–4 weeks before your release date to give Spotify’s editors enough time to review it. To meet this deadline, upload your files at least 4 weeks in advance.
When crafting your pitch, focus on the song itself rather than your career achievements. Editors are interested in the music’s vibe, instrumentation, and sound. Be specific - describe your track with details like "indie rock with post-punk influences and driving drums" instead of generic terms like "alternative." Remember, you can only pitch one unreleased track at a time, so if you’re releasing an EP or album, choose the song that has the best chance of resonating with listeners.
"The gap between uploading music and actually reaching listeners isn't talent - it's planning." - Pierre-Albert Benlolo, Founder, MusicPulse
Once your editorial pitch is submitted, turn your attention to ensuring that your music is properly set up on all platforms.
Confirm Your Platform Submissions
Stick to your timeline and confirm all submissions as soon as distribution is complete. Check your distributor dashboard for a "Delivered" or "Approved" status and verify that your release appears in the "Upcoming" tab of Spotify for Artists and in Apple Music for Artists. While processing usually takes 2–4 days, it can sometimes take up to 7 days.
Double-check every detail. Ensure your ISRC codes, explicit content tags, and songwriting credits are correct, as mistakes can impact royalties and platform eligibility. Also, confirm that your artist name matches perfectly across your cover art and metadata. Inconsistent spelling or punctuation can result in a duplicate artist page, which can take months to fix.
| Platform | How to Confirm | Recommended Lead Time |
|---|---|---|
| Spotify | "Upcoming" tab in Spotify for Artists | 4 weeks (minimum 7 days) |
| Apple Music | Apple Music for Artists / New Release Insights | 10 days |
| Distributor | Dashboard "Delivered" status | 6 weeks |
If your release doesn’t show up in the artist dashboards within 2–4 days, contact your distributor right away. Catching errors late - like during release week - can be a costly mistake, but it’s completely avoidable with an early review.
Step 9: Set Up Analytics and Tracking
Once your content is scheduled and distribution is locked in, it’s time to focus on tracking your campaign’s performance. Setting up analytics before launch ensures you’re capturing accurate data from the very beginning.
Turn On Analytics in PromoLinks.me
Activate the analytics dashboard in your smart link or pre-save page settings. This tool provides real-time insights into visits, click-through rates, traffic sources, and geographic data, helping you understand where your audience is coming from. If you’re using the Pro plan or higher, you’ll also gain access to all-time analytics history, which is perfect for comparing results across different campaigns.
One feature you’ll want to enable right away is pixel retargeting. PromoLinks.me supports Meta (Facebook/Instagram), TikTok, and Google pixels. Once installed on your smart link page, these pixels track every visitor, even those who don’t convert. This data allows you to create highly targeted ads for people who showed interest but didn’t take action - a much warmer audience compared to starting from scratch.
"An email address is more valuable than a pre-save because you can reach that person directly for every future release, regardless of platform algorithms." - Orphiq
Set Up Conversion Tracking
Your conversion rate - the percentage of visitors who complete a pre-save or sign up - is a crucial indicator of your campaign’s effectiveness. Ideally, a well-designed pre-save page should convert between 15% and 30% of visitors. If your rate falls below 10%, it’s a clear signal that something - whether it’s the design, copy, or offer - needs to be adjusted.
Before launch, test your link on both mobile and desktop to ensure that visits are being tracked in real-time and that your pixels are firing correctly. Double-check this across devices to avoid any tracking issues.
"A broken link on launch day is a preventable disaster." - Orphiq
Once your release goes live, compare your pre-save count to your first-day stream numbers. A strong campaign typically sees a pre-save-to-stream ratio of 1.5x to 2.5x.
| Metric | Benchmark | Why It Matters |
|---|---|---|
| Pre-save Conversion Rate | 15–30% of visitors | Shows how appealing your landing page is |
| Below-Average Conversion | Under 10% | Indicates the page or offer needs tweaking |
| Pre-save to Stream Ratio | 1.5x–2.5x | Reflects genuine fan engagement |
With your analytics running smoothly, you’ll be ready to move on to offline promotion strategies, like integrating QR codes, to further amplify your campaign.
Step 10: Use QR Codes for Offline Promotion
Now that your analytics and tracking are in place, it’s time to bridge the gap between your offline and online efforts. QR codes make it easy to turn physical assets like posters, flyers, or merch table displays into direct links to your release page. This strategy complements your digital tracking, tying all aspects of your campaign together.
Generate QR Codes for Your Smart Links
With PromoLinks.me, you can skip using an external tool - this platform includes a built-in QR code generator. Once your smart link or pre-save page is live, you can create a QR code directly from the dashboard and download it as an SVG file. Since SVG files are scalable, they maintain their quality no matter the size, making them perfect for printed materials.
Dynamic QR codes are especially useful because they allow you to update the destination URL without needing to reprint. For instance, you could initially link the QR code to a pre-save page and later redirect it to the live release, all while using the same physical assets.
When printing your QR codes, size matters. For close-up use, aim for at least 1.5″ square, while codes displayed on stage screens should be 6–8″ to ensure they’re scannable from 10–15 feet away. Always test the printed QR code on multiple devices before committing to a full print run.
Connect Your Offline and Online Campaigns
A clear call to action (CTA) is key to making your QR codes effective. For example, a phrase like "Scan to pre-save the new single" immediately tells fans what they’ll gain by scanning. Just as your smart links drive online engagement, strategically placed QR codes can grab fans' attention in physical spaces.
Placement is everything. Consider the context of where each QR code will be used and tailor your CTA accordingly:
| Placement | Recommended CTA | Why It Works |
|---|---|---|
| Merch Table | "Scan for 20% off merch & exclusive track" | Targets fans already in a buying mindset |
| Stage Screen | "Scan to add tonight's setlist to Spotify" | Engages the crowd during the show’s highlights |
| Posters/Flyers | "Hear the new single" | Reaches fans before or after the event |
| Vinyl/CD Sleeve | "Scan for digital liner notes & demos" | Appeals to superfans looking for deeper content |
To track the impact of each QR code, assign unique short link aliases (e.g., promolinks.me/tour-merch or promolinks.me/tour-poster). PromoLinks.me’s analytics dashboard can then help you identify which placements are driving the most engagement.
The numbers back up the effectiveness of QR codes: 39% of concert-goers scan QR codes to access exclusive content at live events. For example, in late 2025, an independent Electronic/R&B artist used QR codes on her merch table and stage screens during two live shows. These codes directed fans to a pre-save page for her upcoming single, resulting in 94 pre-saves before the release was even two weeks old. This effort also helped her achieve 4,200 first-week streams, a 340% increase compared to her previous release.
Step 11: Run a Final Pre-Release Check
Now that you've set up smart links and pre-save tools, it's time to make sure everything is ready for launch day. This final check is all about catching any last-minute issues before they can cause problems.
"A broken link on launch day is a preventable disaster." - Orphiq
Test Your Links and Campaign Materials
Go through every place you've shared your links - Instagram bios, Story stickers, emails, SMS messages, and ad creatives. Test each one on both mobile and desktop devices. Pay special attention to the mobile experience since that's where most fans will interact. Make sure your main call-to-action button, like "pre-save" or "stream", is easy to find and appears above the fold so fans don’t have to scroll.
Check your pre-save flow by authorizing it yourself. Then, confirm that test emails show up in your PromoLinks.me dashboard. If you notice that your pre-save page has a conversion rate below 10%, it might be time to tweak the design or messaging.
Also, double-check that your smart link transitions smoothly from pre-release to live-release mode without breaking the URL. Finally, ensure all your tracking tools are working properly and capturing engagement data without any hiccups.
Confirm Your Analytics and Tracking Are Working
Accurate data collection is critical for making smart post-launch decisions. Spotify’s algorithm, for instance, analyzes key engagement signals - like saves, repeat listens, and skip rates - during the first 72 hours after your release. If there are any gaps in your tracking, it could hurt your track’s placement in playlists or recommendations.
Use the Meta Pixel Helper browser extension to confirm that your tracking pixels are firing correctly on your pre-save and smart link pages. Within PromoLinks.me, make sure your analytics dashboard is recording all click data and attributing traffic to the right sources. Additionally, check that you have active access to both Spotify for Artists and Apple Music for Artists. Keep in mind that Apple Music’s New Release Insights may take up to 8 hours to show same-day data.
| Element to Check | What to Verify |
|---|---|
| Smart link buttons | Ensure each DSP directs users to the correct page on mobile and desktop. |
| Pre-save flow | Confirm authorization works and adds the track to a library. |
| Email capture | Verify test submissions appear in your PromoLinks.me dashboard. |
| Tracking pixels | Use Meta Pixel Helper to confirm pixels are firing properly. |
| Artist dashboards | Confirm active access to Spotify for Artists and Apple Music for Artists. |
Conclusion: Get Ready for Release Day
Recap of the 12-Step Checklist
Every step in this process is crafted to help you launch your music effectively. Start by locking in your release date 4–8 weeks ahead. This gives you enough time for distribution, editorial pitching, and campaign preparation. Before moving forward, finalize your audio files, metadata, and rights. As Orphiq emphasizes, "One typo in metadata can delay your release or create permanent catalog problems". Once that's squared away, focus on creating visuals, setting up smart links, launching pre-save campaigns, and collecting fan emails.
The final steps are all about building momentum for release day. Plan and schedule your content, submit your track to playlists early, activate analytics and tracking tools, and use QR codes to connect offline promotions with online traffic. Finally, conduct a thorough pre-release check to ensure there are no last-minute surprises.
Here’s a quick breakdown of the process:
| Step | Focus Area |
|---|---|
| 1–3 | Foundation: dates, files, visuals |
| 4–6 | Setup: links, pre-saves, email capture |
| 7–9 | Promotion: content, playlists, analytics |
| 10–12 | Polish: QR codes, final checks, tracking |
Your Next Steps as an Independent Artist
Now that you’ve got the steps down, it’s time to focus on refining your workflow for future releases. The more you do this, the faster and easier it becomes. By the time you hit your fifth release, you could have your entire setup completed in just 30 minutes. This efficiency frees you up to concentrate on your music and connect with your audience.
"Most releases do not fail because the song was weak. They fail because the campaign started the day the track dropped." - De Novo Agency
With over 120,000 new tracks uploaded to streaming platforms daily, preparation is what makes the difference between a track that gets noticed and one that fades away. Tools like PromoLinks.me can centralize your smart links, pre-save campaigns, email lists, and analytics, making it easier to manage your release while strengthening fan engagement. A well-executed campaign can turn your music into a standout moment.
FAQs
What should I do if I only have 2 weeks before release?
If your release is just two weeks away, it’s time to zero in on pre-release promotion and launch preparation. Start by sharing your pre-save link everywhere - social media, email newsletters, and even in your bios. The goal is to make it as easy as possible for people to find and save your release.
To build excitement, use engaging content like short snippets, teasers, or countdown posts. These can grab attention and keep your audience looking forward to the big day. At the same time, make sure all your assets are ready to go - this includes your artwork, metadata, and the final master of your release.
Finally, map out your release-day activities and stick to consistent messaging. Creating a sense of urgency is key to boosting engagement, especially with a tight timeline like this.
How many pre-saves should I aim for to trigger streaming algorithms?
Aim to get pre-saves from about 10–20% of your active audience. For instance, if you have 1,000 listeners, aim for 100–200 pre-saves. This kind of engagement sends a strong message to streaming platforms, encouraging them to prioritize your release in their algorithms.
What are the most common metadata mistakes that delay releases?
Metadata errors can throw a wrench in music release plans, leading to frustrating delays. Common issues include misspelled artist or track names, incorrect or missing ISRC codes, wrong genre classifications, and inaccurate songwriter credits. These problems might seem small, but they can slow down royalty payments and platform approvals.
Other frequent mistakes? Incorrect release dates, unregistered compositions, and mismatched splits. Each of these can cause unnecessary hiccups in the process.
The solution? Take the time to double-check every metadata field and ensure everything is consistent across platforms. A little extra attention upfront can save a lot of headaches later.
Related Blog Posts
Ready to create your smart links?
Join thousands of artists using PromoLinks to promote their music smarter.
Get Started Free